Design Philosophy

I am a junior interior design major at Washington State University. I have always been interested in design. I enjoy creating abstract and organized spaces. Figuring out corrections to problems through design is a process I believe is fundamental. When I design I want to meet the needs of a client in a creative way. I like to find multiple solutions to a problem to hear opinions to consider a different approach. I think design should have meaning, and that is what I strive to tell in my designs.

Monday, April 29, 2013

Little White Schoolhouse | Valley, WA


This is an adaptive reuse project for the Little White Schoolhouse in Valley, WA. The schoolhouse is proposed to be a heritage museum of Valley's history. For this project I worked with my partner and we strengthened our programing and rendering skills. I enjoyed this project because we worked with RCDI and had input from community members. This project had a stronger meaning than any other project I have designed because the community really wants to design this heritage museum. It's not just a paper assignment. So I feel like my design is going toward bettering a community.

Sunday, March 31, 2013

IA Lecture Notes


Above are sketch notes I took at a lecture by Interior Architects. At this lecture the speaker stressed how important it is for the disciplines designing a building to interact as the design is happening. Not handing it off when your discipline is done with it. He said that this way of designing aids in efficiency and cost. I think that the integration at WSU between interior design, landscape architecture, construction management, and architecture is a step to toward what the professional field is like.

Monday, March 18, 2013

The Appaloosa Museum and Heritage Center was a good place to study for my studio project in Valley, Wa. I am designing a schoolhouse museum for their community to display the history of the town. This museum gave examples of what is useful in a museum and ways I can improve my design.

This this a brick walkway that has names of donators. The community where my studio project is expressed they needed ways to fund the museum and this would be a way to do so. 


 This wall was an inspiration to me because the community of Valley said they wanted a chronological sequence to their museum. This wall has a flow to it that would be beneficial to the design.


The Valley community will have items to display that shouldn't be touched. Display cases like these would make everything visible and protected. To combine interactive and enclosed displays breaks up the monotony of a museum.

Tuesday, February 19, 2013

Webster Environmental and Earth Sciences & Physics Exhibit Design

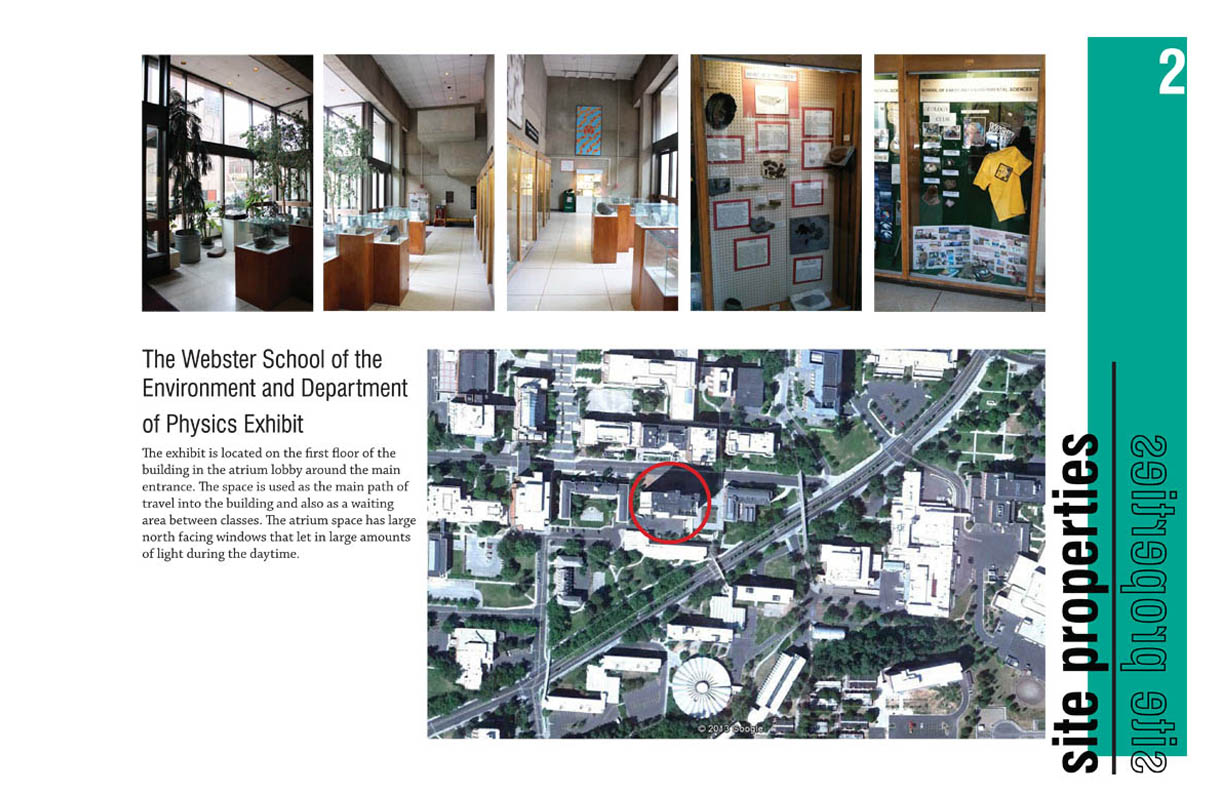
The geology-environmental sciences-physics exhibit in Webster Hall is on the Washington State University campus. This geology exhibit showcases seven display wall cases and eight moveable cases on the floor. The physics displays are six interactive exhibits. The flow of the space before was not conducing to bringing people into the exhibition space. This may be due to the out of date content being displayed. My team of nine and I brainstormed ways to bring the public into the exhibition space through design.

 Credit: Kimberly Cox, Megan Pharmer
 
Credit: Kimberly Cox, Megan Pharmer

We started off by creating a chronological story in the seven geology wall displays. My team and I each researched a topic and then one team member created the graphic displays. I believe our displays are cohesive and create hierarchy, but seem to be on the dark side. That is not a bad thing though because of the strong daylight of the windows, this dark background will provide contrast.

 
Content Credit: Kimberly Cox, Megan Pharmer; Graphic Display: Elizabeth Jurgeleit

To make the geology wall displays more interactive we added some hands on learning components. Such as this one with moving blocks to learn about the different boundary types. I know when I took the Geology 101 course I had trouble remembering the boundary types, I feel like a tactile model will be beneficial to learning.

 
Credit: Megan Pharmer

The light study I did was at night to see how the electric lights were displaying the material. The lights were strongest in the wall display cases. During the day the daylighting was where the brightest light was at.

Day Study
 
Credit: Alicia Brandkamp, Taylor Brock

Night Study
 
Credit: Kimberly Cox, Megan Pharmer

The circulation plan we developed is to create a crossing flow of people. They do not need to go straight back to the elevators, the open feel with the benches will bring people into the space. Because there are now benches centrally located this will attracted people to stay awhile and enjoy the exhibit. Through the development of the floor plan the circulation was thought of. I found circulation to be a large contributor in the placement of objects. I think I strengthen my reconfiguring skills during this project because the existing furniture and components all needed to stay in the space.

Credit: Megan Pharmer

The physics interactives are interesting, but have out of date signage. It is long text that is written in a formal matter. We did not “dumb” the content down; we just reorganized it with the use of color to create hierarchy and attraction. I also helped with the graphic display and content of the program for this project. From this part of the project I strengthened my graphic design and my use of design language skills.

Credit: Marit Pinkoske, Megan Pharmer
 
Credit: Marit Pinkoske, Megan Pharmer
 
 Credit: Marit Pinkoske, Megan Pharmer
 
 Credit: Marit Pinkoske, Megan Pharmer

This project was done in a group of nine, which is one of the largest teams I’ve worked in. I enjoyed seeing the collaboration of group members on tasks, as well. We all had our partners within the group that we could work on our parts with. All nine of us checked in periodically to see how others were getting along with their parts.

I think this project helped me strengthen my organization skills and meeting deadlines. Working with a small budget was interesting to create simple solutions that will make a large impact in the space. Small changes can lead to the outcome that we want in the space which is for people to enjoy it and learn.

Tuesday, May 1, 2012

Depot Final Project

These are my final boards for my depot project. The Northern Pacific Depot is a train depot in downtown Pullman, Wa that I did an adaptive reuse of. The depot will contain a residence, a studio, and a gallery for the artist. I completed 4 perspectives, one of the gallery lobby, gallery space, studio, and the great room of the residence. I chose materials for these spaces as well. I also completed elevations and sections throughout the depot. There are demolition and egress floor plans that I was new to. The furniture floor plan is also repeated in the final model. My process board shows a bit of the process throughout the project. I chose to use the bright yellow for the boards because it was the color I started with in my parti. I also applied my textile pattern to the background of my posters in gloss black. It does blend with the matte black background but adds to the presentation. From this project I learned more about technical drawings and codes that go along with them. I would say my concept was developed well through the process of finding an inspiration object and working with 2D and 3D abstractions to then develop into the depot design.

Depot Study Models

These are study models of my 3D development of my Depot design. I was able to plan floor plans in a way I could visualize. I also was able to think of ways to apply my concept to the project. This first model I made the residence on the far left too large, but I liked where the gallery and studio locations. For the second one I liked the radial symmetry of the gallery, but there were lots of tall windows on the exterior walls. This would not allow many paintings to hang on the walls. The third has the gallery on the far left and has walls on either exterior wall for easy viewing, but did not apply my concept very well. The fourth is pretty similar to the second model I just moved some of the central studio walls for different circulation. This fifth model is the most like my final floor plan. I used radial walls in the gallery that have different rotating positions. The "L" shape of the studio allows the residence and the studio entries to be on opposite walls for distinctive entries. I learned from this project to push for ideas that would not otherwise be tried because this was not meant to look perfect. It was meant to spark an idea that would not be explored on a 2D piece of paper.

Tuesday, April 17, 2012

Depot Concept Model


This is the parti I made from my door hardware inspiration. This parti employs emphasis, line, contrast, and balance. Emphasis is seen in the yellow line. Line is used in the straight and curved lines. Contrast between black and white and straight and curved lines. This parti has a symmetrical balance.


This is my concept model I used for inspiration for the depot design. I designed this concept model my starting with door hardware I saw at the depot and then developed a 2D parti. I took the elements and principles from the door hardware and the parti to create the concept model in 3D. The model has emphasis at the metal ball that radiates out to the lines and then connects back to the metal ball. There is a use of curved lines and contrast between the white and metal materials. The balance of this model is asymmetrical. I have done this process of working from 2D to 3D and I believe it helps with the design of the overall plan because it enables me to think abstractly before planning a space. The exploration to create an abstract object creates ideas to employ into the overall design.